Blake Walters
Articles
- Listening to DOM Events
Working on a recent project, I ran into an issue with 1password autofill causing unexpected results with a form I’d built. I needed to know what browser events were being fired on a specific field in order to debug the problem. There are a few options here - bind an event listener in-code to every conceivable event and then log the arguments passed to the console to see what the event happened to be or better yet, just use
monitorEvents.Recent versions of webkit browsers and firebug support the
monitorEventsmethod, which takes a DOM object as it’s only argument and will spit out every event occurring on that object to the console. So you can run a bit of code like somonitorEvents(document.getElementBy('someid'))where someid is the id of the thing you want to monitor and you’re all set without ever having to touch your own code.
- Practical Tips for Custom Plugin Development: EECI 2012
I’ll have a more extensive write up later (thought EE Insider’s write-up is pretty good on its own), but I wanted to put up a quick note that my slides and companion code are available online.
You can view the slides over on Speaker Deck and a repository for the code has been created over on GitHub.
Thanks to everyone that made it out!
- Alfred Tip: Hotkey a Folder
I switched to Alfred from the once great Quicksilver not too long ago and instantly bought the Alfred Power Pack solely to have access to the system-wide hotkeys it provides.
One trick I found helpful was to hotkey a folder for quick access to my most used directories on my computer. If you have the power pack, it’s quite simple. Open up your Alfred preferences and go to the Global Hotkeys panel. Add a new hotkey and instead of selecting an app or a file, just select a folder for the “action” and set your hotkey.
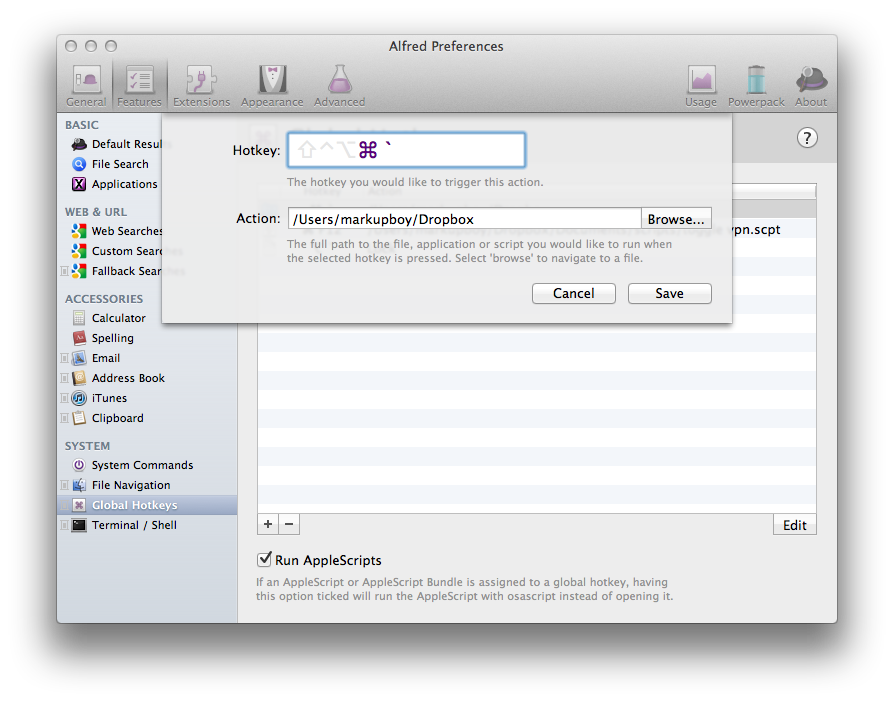
Now, using that hotkey will open a finder window for that directory; it’s that simple. I currently use CMD + ` to open my Dropbox folder and CMD + ALT + ` to open my mounted file server.
- New, More Reliable RSS Feed
Last night I discovered that my RSS feed was down for the count. After a ton of debugging, some gnashing of teeth, and googling how to properly write a 301 redirect in an htaccess file, I think I’ve cracked it.
The original feed should continue to work and all of the old urls for that feed should be redirecting to it. There is also an new alternate feed at feeds.feedburner.com/markupboy that will be the new canonical feed going forward.
- ExpressionEngine Add-On Templates Made Easy
I’ve recently gotten more into custom EE Add-On development and have found Pkg.io to be an invaluable resource. You can package up templates for every type of add-on imaginable, and it pretty much does all the work for you short of, you know, actually writing the add-on.
- Toggling VPN with AppleScript
Since moving back to Boulder, I’ve been using Viget’s VPN more and more often to grab stuff off of our shared fileserver. I take a fairly minimalist approach to my menu-bar (going so far as to remove the clock from it) so I wasn’t thrilled about having the VPN icon up there but having to open up network preferences to connect and disconnect from the VPN wasn’t terribly fun either.
Enter AppleScript. After a bit of digging, I found that you can script the connecting and disconnecting of a given VPN. Grab the name of the VPN service you’d like to easily toggle and open up AppleScript editor and paste in this script:
tell application “System Events” tell current location of network preferences set VPNservice to service “VPN SERVICE” — name of the VPN service set isConnected to connected of current configuration of VPNservice if isConnected then disconnect VPNservice else connect VPNservice end if end tell end tell
You’ll want to change “VPN SERVICE” to the name of your VPN connection from network preferences (retaining the quotes). Running this will switch the states of your VPN from connect to not. That in and of itself isn’t terribly interesting but if you have a app that can handle system-wide hotkeys (like Quicksilver, Alfred, or Keyboard Maestro) you can bind this script to run at the press of a button (for me, it’s just Cmd + F12).
- TextMate Quicky - Find a Bundle Command
Using a bundle you’re not quite familiar with in TextMate? Don’t remember exactly what snippet use to generate the model stub in Django (just like me five minutes ago)? Fortunately, TextMate as always has you covered. Pressing CTRL + CMD + T will bring up the “Select Bundle Item” window, allowing you to easily search the current bundles list of snippets and commands.
- Dots for Tots
This Friday, March 25th, 2011, some of my great friends at Viget and I are hosting the first annual Dots for Tots Ms. Pac-Man marathon. Starting Friday morning at 8:00 am EST we’ll fire up our original Ms. Pac-Man cocktail table and won’t quit until donations stop coming in and we’ll be broadcasting the whole thing live on our site at dotsfortots.org.
Every cent donated goes directly to Child’s Play Charity so come check us out, enjoy the show, and help out a really great cause.
Dots For Tots harnesses the power of Ms. Pac-man, and our irrational love for her, for good.
The first annual Dots For Tots is a gaming marathon of nostalgic proportions. The Falls Church, VA office of Viget Labs proudly boasts a cocktail model of Ms. Pac-Man - and a handful of Viget’s web nerds play the classic arcade game a bit too much. So on March 25, starting at 8am EST they’ll hold a Ms. Pac-Man marathon to raise funds for Child’s Play, a charity that gives games to children’s hospitals worldwide.
Donations are taken on the site and 100% of the proceeds go straight to Child’s Play. As the donation total rises, so does the length of time that the team will continue to play Ms. Pac-Man. The initial goal is to play for eight hours and raise $1,200 but the game will extend as long as donations allow. The marathon will be broadcast live at dotsfortots.org where viewers can watch the action, see the scores, donate money, tweet at the players, and chat with them via UStream. The players will chart their scores over the day and battle it out to make the Top 10 list. As the day progresses, the competitive spirit might turn the players against each other, or at the very least make them loopy after several consecutive hours of Ms. Pac-Man. Either way it promises to be entertaining and for a worthy cause.
For more information, check out dotsfortots, www.twitter.com/dotsfortots, or email dotsfortotscharity@gmail.com
- Fun Pointless Console Trick
clear();
Yep, just like in terminal, the JavaScript console in your favorite browser has a clearing method.
- Clipboard History in TextMate
I have untold amounts of love for TextMate and clipboard history is one of the many reasons why. Simply hit
CTRL + OPT + CMD + vand you’ll see a small popup window containing a history of your recent clipboard contents (from both inside and outside of TextMate itself).- Keeping Files Safe and Synced
I’m kind of a nut about keeping personal data safe online. I use 1Password to generate and store all of my login credentials and I get irritated when websites don’t let me use 40 character passwords.
Just as important, though, is keeping files safe and secure. For that, I have [Knox], a wonderful piece of software that has an incredibly important job that happens to now be maintained by the amazing developers at Agile Web Solutions
A little background info - Mac OS X, right out of the box, has the ability to create and secure disk images. Just like a virtual hard drive, disk images can store files and folders and can even be encrypted. When unmounted, they just appear as a single, compact file. Unfortunately, creating, managing and maintaining encrypted disk images in OS X can be somewhat of a chore.
This is where Knox comes in. It lives in your menubar when in use (and honestly, I only keep it open when needed but it hardly uses any resources) and allows you to easily create, open and backup encrypted disk images.
Creating and opening images are as easy as two clicks and backing up images can be handled manually or on a schedule with a pre-set backup location. And for piece of mind, should you ever decide to stop using Knox or need to get to a file locked away in an encrypted image, since Knox uses OS X’s built-in disk creation process, any images created can be opened on any Mac, with or without Knox.
Syncing encrypted images between computers is a breeze, too. In Knox’s general preference panel, just set the “Create new vaults in:” setting to a folder inside Dropbox (you are using Dropbox, right?). Repeat this procedure on every machine you have with Knox installed and they’ll all have access to you secure files.
So that’s it. Knox, once again proving that the best kind of a app is on that does exactly one thing extremely well.
- Terminal Tip - Copying Your Current Path to the Clipboard
I spend most of my day bouncing between the terminal and TextMate and often need the full path of where ever I happen to be in my shell. OS X comes with a great built-in terminal command -
pbcopy- for just such occasions.Copying your path to the clipboard is as easy as getting the present working directory and piping it to
pbcopypwd | pbcopyI found, though, that this leaves the carriage return at the end of what was copied. We can fix this using the translate characters command
tr.pwd | tr -d "\r\n" | pbcopyThis will remove all instances of the carriage return / line feed pair coming out of
pwdand pass it to your clipboard. Of course, it’s not the easiest thing to remember, so I’ve aliased it to the commandgetpathin my shell configurationalias getpath='pwd | tr -d "\r\n" | pbcopy'And that’s it. Now when I’m in a terminal session I can simply run
getpathand my location in the filesystem is copied right into my clipboard.UPDATE: With a recent update, my getpath alias stopped working. For whatever reason,
trjust stopped trimmingpwds output correctly. Fortunately, I happened on an even easier way to grab the current path by piggy-backing on the$PWDenvironment variable. So here’s the new and improved get path:alias getpath='echo -n $PWD|pbcopy|echo "current path copied to clipboard"'- Watermelon - Dummy Images in TextMate
Doug Avery’s immeasurably helpful TextMate bundle allows you to easily insert dummy and placeholder images into your markup, simply by using the “dummy” and “place” tab triggers.
- jQuery Niceties - Dismissing Lightboxes
Lightboxes have been the all the rage for years now; especially since frameworks like jQuery make them fairly easy to accomplish. One little piece that I always find lacking, though, is even the tiniest bit of keyboard support. Want to help your power users out a bit? Bind the escape key to dismissing lightboxes.
The most straightforward way is simply to bind the escape key to trigger a click on the lightbox close button once the lightbox is open.
$(document).bind('keyup', function(e) {
    if(e.keyCode == 27) {
        $('.lightbox a.close').click();
    }
})
If you don't want it permenantly bound, you can always bind the event when the lightbox opens and unbind the event when the lightbox closes. Unforutnately this is a little brittle as it depends on the functionality of closing the lightbox to be bound to the close button (or for the close button to in turn trigger the closing of the lightbox). We can use custom event binding to make it all a little more elegant.
First, bind a custom event to the lightbox that can be triggered when it needs to be dismissed:
$('.lightbox').bind('dismiss', function() {
    // code to dismiss lightbox
});
And then just trigger that event when escape it pressed:
$(document).bind('keyup', function(e) {
    if(e.keyCode == 27) {
        $('.lightbox').trigger('dismiss');
    }
});
The nice thing here is that the dismiss code can now be executed by any event that needs it (saving a form in the lightbox, clicking the close button, pressing escape, etc.) without code being duplicated.
Some further reading that might be of interest:
- Working with Events Part 1 and Part 2 over at Learning jQuery
- My article on limiting characters in a text area which covers keybinding
- Forcing Tab Types Per Language in TextMate
Personally, I’m a hard-tabs guy. I like coding with invisibles enabled, I like being able to adjust the size of my tabs on a whim and I like that I’m not bloating by markup with unnecessary white-space. Unfortunately, some languages and methodologies prefer them so I found myself stuck switching back and forth frequently.
TextMate, being one of (if not THE) best editors for OSX, has a pretty handy solution for this. You can edit a languages bundle to force the default soft tabs setting per language.
Open up the bundle editor ( Bundles -> Bundle Editor -> Show Bundle Editor), click the carrot next to your language of choice to expand that language’s bundle items and find the entry marked “Miscellaneous” . Now, you just need to append to the “shellVariables” object a quick shell variable setting -
shellVariables = (
    {
        name = 'TM_SOFT_TABS';
        value = 'no';
    },
);
If the shellVariables object doesn’t exist, don’t worry, it’s safe to just create a new one. For instance, the default CSS miscellaneous bundle preferences look like this:
{
    smartTypingPairs = (
        ( '"', '"' ),
        ( '(', ')' ),
        ( '{', '}' ),
        ( '[', ']' ),
        ( '"', '"' ),
        ( "'", "'" ),
        ( '`', '`' ),
    );
}
And the new adjusted preferences with soft tabs explicitly disabled:
{ shellVariables = ( { name = 'TM_SOFT_TABS'; value = 'no'; }, ); smartTypingPairs = ( ( '"', '"' ), ( '(', ')' ), ( '{', '}' ), ( '[', ']' ), ( '"', '"' ), ( "'", "'" ), ( '`', '`' ), ); }- DevNation, Falls Church
I'm speaking at DevNation on Saturday, August 28th! It's a really great line-up for a super low price so come join us if you get the chance.
Here are all the pertinent links and downloads from my presentation:
- Commafy - Pretty Numbers for Python
I've been spending more and more time in Python and Django lately working on side project lostaga.in and Viget Ms. Pac-Man. Here's a quick method I put together for formatting numbers with commas:
def commafy(d): s = '%0.2f' % d a,b = s.split('.') l = [] while len(a) > 3: l.insert(0,a[-3:]) a = a[0:-3] if a: l.insert(0,a) return ','.join(l)- Minimalist Star Wars Tourism Posters
Justin Van Genderen's beautifully designed vintage destination posters for locations featured in the
not shitty like the otheroriginal Star Wars trilogy.- jQuery 101 - The Slice Method
Continuing the 101 series, this we're time hopping over to javascript and a look into part of my favorite library jQuery. More specifically slice(). In a nutshell, we can use slice to manipulate a set of match objects grabbed out of the DOM by the jQuery core method.
If you're familiar at all with the basic JavaScript slice() method it's application here is nearly identical. Slice() takes two arguments: a start value and an option end value. Just like in slicing in an array, performing a slice() on a jQuery set returns the elements starting at the start position and ending just before the end position. If no end is given (remember, that one's optional), the returned set starts at 'start' and ends at the end of set.
Now, that might not sound quite so straight forward but let's step back and remember one fundamental aspect of jQuery: a jQuery set is really just an array and the array is ordered in the same order each element is found in the DOM. Take this list for instance:
<ul class="colors">
    <li>Red</li>
    <li>Orange</li>
    <li>Yellow</li>
    <li>Green</li>
    <li>Blue</li>
    <li>Indigo</li>
    <li>Violet</li>
</ul>
We can create a set of those list items using:
$('ul.colors');Now, that by itself doesn't do anything at all, but we can visualize the set as an array with "Red" at position zero, "Orange" at position one, "Yellow" at position two and so on. This makes figuring out slice a piece of cake. Let's see how it might work in practice:
$('ul.colors').slice(2,4).hide();Will hide "Yellow" and "Green" (We start at position 2 and end just before position 4).
Another fun trick is using a negative number for the start position. When a negative number is passed in the slice starts from the end of the array instead of the beginning. This would mean that
$('ul.colors').slice(-3).hide();will hide "Blue", "Indigo" and "Violet". Now obviously these examples aren't exactly real world practice but they help illustrate the point. Good places to use this is in dealing with paging for circular carousels (a discussion for another day), in page pagination (hiding everything but the first three paragraphs of a post with a "read more" link) and more.
There is even another nice pro-tips about jQuery's slice: it's non-destructive on existing variables:
var colors = $('ul.colors');
colors.slice(1,4).hide();
If we run console.log(colors), the entire set is still there, "Red" through "Violet".
So there you have it - the jQuery slice() method; another invaluable tool in the front-end developers toolkit.
- A Better Method for Clearing Default Form Input Values
A while back I wrote a quick post on how to clear default form values on click. Using jQuery, we leveraged the "defaultValue" variable associated with each input object and on focus simply checked whether the current value equalled the defaultValue. If it did, we cleared it, easy as that.
Unfortunately, that's not as semantic as it could be (even less so if we're not already using a label). On top of that when the form is submitted we have to check every form element we've handled this way and clear it out if it hasn't been set; if we don't, the default values will end up getting submitted.
Using an alternate method we can get around this altogether:
Start with a basic, completely semantic text-input with a label
<p class="input_group">
    <label for="find_a_location">Find a Location</label>
    <input type="text" name="find_a_location"
        value="" id="find_a_location"></input>
</p>
The input is as plain as it gets, with a name and an id. The label's nothing too special either, just make absolutely sure the 'for' attribute matches the inputs id. The last piece is that I've gone ahead and wrapped the two in another tag and classed it "input_group". This doesn't have to a paragraph tag (a span or li would work just as well), but know that whatever you use will end up having to act a block level element for the positioning of the label.
Next, a dash of CSS to pretty things up a bit. Start by styling the input itself; not terribly necessary, but certainly makes everything more attractive:
input {
    width: 350px;
    border: 10px solid #e2e1d4;
    font-size: 14px;
    padding: 7px;
    outline: none;
    border-radius: 7px;
    -webkit-border-radius: 7px;
    -moz-border-radius: 7px;
}

input:focus {
    border: 10px solid #9c836e;
}
Adding the :focus pseudo-class helps to draw a users attention to the active field.
Next we need to set up the input_group so that we can position the label correctly:
p.input_group {
    width: 350px;
    margin: 1em auto;
    position: relative;
}
And finally, drop the label over the input, giving the appearance that it's actually inside the input:
label {
    font-size: 14px;
    font-family: verdana;
    position: absolute;
    top: 19px;
    left: 19px;
}
We can even give the label a focus class (that will be triggered by javascript later) to push the illusion even further:
label.focus {
    opacity: 0.2;
    -moz-opacity: 0.2;
    filter:alpha(opacity=20);
}
The last piece of the puzzle: the experience layer thanks to JavaScript.
Get started by looping through all the fields we want to set up:
$('p.input_group input').each(function() {Set up some variables we'll need for later (mainly storing the label that points to this input):
    var id = $(this).attr('id'),
            $label = $('label[for='+id+']');
On page load, if there's already a value in the input, hide the label (this fixes an issue if the user hits the back button and the field is already filled):
    if($(this).val() != '') {
        $label.hide();
    }
When the input is focussed, add a 'focus' class to the label:
    $(this).focus(function() {
        $label.addClass('focus');
    });
When the input is blurred, remove that 'focus' class
    $(this).blur(function() {
        $label.removeClass('focus');
    });
When a key that adds to the input's value value (any letter, number or other ascii character) is pressed, hide the label because the user is actively typing in the field.
    $(this).bind('keydown', function(e) {
        if(e.keyCode >= 48 ) {
            $label.hide();
        }
    });
When any key is release, check the value; if it's blank, show the label again. This means when a user delete or backspaces through the field, cut's all the text or does anything to blank it out the label comes back
    $(this).bind('keyup', function() {
        if($(this).val() == '') {
            $label.show();
        }
    });
And close out the loop
});That's all there is to it. One thing to note, this isn't meant to be a replacement for the original method, merely an alternative. There are situations where one will definitely be more viable than the other. Just use whatever works best.
- An Event Apart - Chicago
For two days in Chicago, I had the privilege to attend An Event Apart - "an intensely educational two-day conference for passionate practitioners of standards-based web design" (from http://aneventapart.com). Divided amongst 12 hour-long sessions, we had the privilege of learning about everything from design to content strategy to in-depth javascript and css techniques from some of the top figures in the industry.
While there's way too much information to go over each bit in detail here, what follows is a notable sound byte from each presenter and an overview of how it fit into their overall presentation:
"One of the biggest tragedies in design is having a beautiful site that fails with real content"
A Site Redesign - Jeffery Zeldman, author, Designing With Web Standards, 3rd Ed.
A common problem in our business, having a beautiful design filled with Lorem Ipsum text. We're all capable of generating content; even if it isn't production ready we can make it realistic. We shouldn't be designing specifically for a specific number of lines of text or a fixed amount of characters. Designing from realistic content out instead of from visual design in (with content coming later) will allow our sites to be more flexible, easier to maintain and in the end more sustainable.
"Design systems, not pages."
Thinking Small - Jason Santa Maria, web designer
To maximize flexibility, we should be designing visual systems instead of specific pages. Using modular design speeds up the design process, allowing design pieces to be mixed and matched without the need for designing every aspect of every page. Again, using this approach makes sites more flexible, easier to develop, easier to maintain and even simpler to refresh layouts with little overhead.
"Content is not a feature"
Content First - Kristina Halvorson, author, Content Strategy for the Web
Content shouldn't be an afterthought. The backbone of information driven sites is the content itself and should be as integral a part of website creation as development or design. In fact, content can help dictate design patterns, look and feel for specific pages or even the tone of how a page is meant to be presented. All content has to be planned for - headers, body copy, footer text, error messages, titles, descriptions, alt text, metadata, everything.
"Everyone is a UX designer whether it's in your title or not"
DIY UX: Give Your Users an Upgrade (Without Calling in a Pro) - Whitney Hess, Strategic Partner, Happy Cog
Everyone involved in web design and development, whether they are UX people or not, are UX designers. We all have an influence over how users perceive and use a site from the feelings the visual design conveys to the responsiveness of the front-end implementation. The best way to find break downs in any of these aspects is to get the site in front of users, to do user testing. Testing doesn't have to be expensive or complicated, it can be as simple as asking people you know, people you work with (but not on the same project) or people that just happen to be around at any given time to use something and give feedback. The trick is to make sure they don't feel compelled to say "oh it's good" because being "good" won't make your site any better. Get users to tear it apart and grow from there
"Static designs fail by definition"
Walls Come Tumbling Down - Andy Clarke, author, Transcending CSS
Websites aren't just carbon copies of photoshop comps. They're living breathing things that act and react to user input. Why, then, do we continue to get client signoff based on static comps? Designing in the browser itself with CSS can potentially take the same amount of (if not less) time that putting together a comp in photoshop but in the end you have a living document that's clickable, scrollable and easily adapted to be used in production. How long would it take to change every single font-face in a comp? With CSS it takes minutes.
"Over time, plugins like the Flash player will give way to <script>"
Javascript Will Save Us All - Eric Meyer, author, CSS: The Definitive Guide, 3rd Ed.
The improvement of Javascript engines in just the past few years is astonishing. Just think of how far we've come from MapQuest to Google and the interface improvements it affords. At the core of all of these great applications - Facebook, Mint, Google Docs and Maps and More - is just HTML, CSS, and Javascript. We're currently in a pattern of using JS to bring legacy browser into the present - patching in support for basic features today that just didn't exist when browsers like Internet Explorer 6 debuted. If we flip our thinking a bit, however, there's no reason that we can't use javascript to push current browsers even further into the future.
"It's cheaper to build something than to have the meeting to discuss the thing you might build"
Building Stuff Fast-And Getting It Approved - Simon Willison, Developer, Guardian News and Media
1 hour kick off meeting, 6 people = 6 man hours
4 hours prototyping, 1 developer = 4 man hours
Developing web applications isn't difficult. No really, it isn't. What's difficult is coming up with an idea, getting everyone on the same page, getting client sign-off, coming up with a core visual identity, going through rounds and rounds of approvals and so on. Thanks to web development frameworks like dJango, Rails and Symfony all of the repetitiveness of building the core functionality of a web app has been boiled down to a few lines of code and maybe a terminal command or two. The sooner you get your stuff in front of users, the more apparent it becomes what they actually want and what is actually wrong with what you've done. Plus, banging out great prototypes is more fun than sitting in meetings anyway.
"Forms suck"
Web Form Design in Action - Luke Wroblewski, author, Web Form Design
No one likes filling out forms. Unfortunately the web runs on them. We can't have user generated content, content management systems, web applications or any of it without forms. While they may be the doldrums of user experience, they don't have to be bare and confusing and inelegant. There are a few ways we can go about making form submission as painless as possible and, in turn, reduce fall-off before people click submit:
- Have a clear path to completion
- Align labels consistently (top aligned labels can increase form entry speed by 10x)
- Add help and tips to anything unfamiliar or with constraints
- Use inline validation to avoid pogo-sticking back and forth between submission and feed back
- Separate out visual cues for primary form actions
- Organize your forms logically
- Gradually engage users - only get the information you actually need to continue up front
"We are product designers"
Designing Virtual Realism - Dan Rubin, co-author, Web Standards Creativity
The unfortunate part of designing for the web is that you can't touch it except through extensions to ourselves (mice, keyboards, etc.) but most principles product design apply to the web. If you design for intuition, your sites will feel better. It may not be quantitative, but a site that feels better and looks better will actually have better response from users, even if it isn't any more function than it's competitors (case in point, the original Apple iPod, beautifully simple and simply beautiful).
"Do websites need to be experienced exactly the same in every browser? Nope"
Progressive Enrichment With CSS3 - Dan Cederholm, author, Bulletproof Web Design
CSS3 is a wonderful tool that can't necessarily be used for mission critical implementation but can be used to enrich experiences in browsers that support them. Experience is the layer that lives on top of good markup and style and css3 is the icing on top of that.
All in all it was a fantastic conference and I'll leave it with my favorite thing that was said by Jeffery Zeldman himself:
"Real web designers write code. Always have, always will."
- Newd Now Supports Google's Proposal for Crawlable AJAX
Yesterday morning, Google posted a proposal for making AJAX crawlable on it's Webmaster Central Blog. They posited that using a standardized convention for fragment identifiers to represent AJAX application states, taking snapshots of these states using a headless browser and using an escaped version of the original application state fragments to render these snapshots to crawlers would allow for these applications to be indexable as well as being able to have search engines server back links to the AJAX states themselves.
With minimal effort, these changes have been rolled into a fork of Crispin Porter + Bogusky's open source project Newd.
Taking the Hijax approach to web application development, Newd was engineered specifically to be entirely browsable without javascript. Each state in the app was built based on a rendered static page and then rolled into the main application using jQuery and a custom framework written around the modular approach to Newd's data feeds. For instance:
http://newd-example-domain/#topicis simply a deep link, wired up with javascript, that allows the application to render the content at
http://newd-example-domain/topics/topicwithout refreshing or redirecting the user to a new location. This allows all of your AJAX states to have static, crawlable equivalents.
The downfall here is that when Google indexes "/topics/topic", that's the link it serves back to users in it's search results. To subvert this, Newd has a simple javascript detection on pages rendered through "/topics/topic" - if JS is enabled, the user is redirected back to the AJAX app front-end at "/#topic".
Now, however, that redirection is unnecessary thanks to Google's proposed method. Updating the fragment identifiers is simple, all we need to do is at that extra bang to what is already being rendered ("#!topic" instead of "#topic"), making sure that anything parsing this new hash understands and appropriately ignores the exclamation point.
Up next, our static href's in the main navigation links can finally point to the AJAX state instead of having to be set to the static page.
<a href="/topics/topic">Topic</a>becomes
<a href="#!topic">topic</a>Originally, when clicked these links would be parsed by javascript, the hash updated programatically and the default behavior of following the link was prevented.
Finally, Newd needed a way to render the correct topic when presented with the escaped state in the query string (represented by Google's proposed "http://example.com/page?query&escapedfragment_=state"). Being built on CakePHP using the Hijax approach, all static paths were set during the initial implementation which means Newd doesn't require a headless GUI for rendering HTML snapshots of all of its states. Instead, a render time it only needs to be made aware of any escaped states being passed through the url:
if(isset($_GET['_escaped_fragment_'])) {
    $this->params['topic'] = $_GET['_escaped_fragment_'];
}
If the escaped state is passed in the query string, Newd's front_crontoller index method renders the data for the accompanying state for indexing. This rendered page contains our original AJAX state fragments as links, which in turn will get served back through search engine results once crawled.
And that's it. Bringing Newd up to meet this proposed standard took only a few hours thanks primarily it being based on the Hijax approach for AJAX applications. If this new proposal does indeed get adopted it means users will finally have direct access to AJAX content via search results, which is a very exciting prospect.
Browse or download the Newd source updated to this proposed standard at it's page on GitHub
- Git quicky - locally ignore files
Ever needed to modify a file locally but wanted to make sure it doesn't get committed and pushed back in to the stream? Well, if you're using Git, it's as easy as:
$ git update-index —assume-unchanged path/to/file.txtExtremely helpful if you've got password changes in config files that you don't want committed
- CSS 101 - Text-Image Replacement
With the hope that it'll encourage me to post more often, I'm kicking off my first "column" here on markupboy - the 101 series. Each post in the 101 series aims to be a small, easily digestible chunk of information and some sample code illustrating a basic technique or a solution to an every day problem. Enjoy!
For the first post, we'll take a look at a basic CSS technique that I can't seem to go a day without using: text-image replacement.
The basic idea here is to take a block of web-safe text (be it a span, a paragraph, a header, a link or really anything) and replace it with an image representing that same text. Now there are a number of reasons we might do this but most likely it's because we'd like to utilize a font that isn't web-safe.
Let's start with a pretty much standard use - a header:
<h1>Markupboy</h1>with a custom font or graphic:
We'll start with a basic css selector just to get things rolling:
h1 { }Next, we'll give the header the appropriate background image as well as a height and width to match:
h1 {
    background: url(/images/css101-h1.png) left top no-repeat;
    height: 80px;
    width: 240px;
}
Markupboy
As you can see, the image is there with the appropriate dimensions, but our text is still visible. Here's where the real trick is, first set the 'overflow' property to hidden
h1 {
    background: url(/images/css101-h1.png) left top no-repeat;
    height: 80px;
    width: 240px;
    overflow: hidden;
}
and then set 'text-indent' to '-9999px' (or any suitably large negative or positive number)
h1 {
    background: url(/images/css101-h1.png) left top no-repeat;
    height: 80px;
    width: 240px;
    overflow: hidden;
    text-indent: -9999px;
}
Setting the 'overflow' property to hidden on a block level element makes any child element (including text nodes) that falls outside of the rendering bounds of that parent element to be hidden. Then, with 'text-indent', we're forcing the child text node to render as far outside the parent element as possible and there you have it. We don't need any extra markup in this case and we don't have to resort to 'display: none' as that would cause accessibility issue with screen readers not even being able to access that text.
To take it one step further and make our header a clickable link, we just need to modify the markup a bit
<h1>
    <a href="http://www.markupboy.com">Markupboy</a>
</h1>
and adjust the css slightly
h1 a {
    background: url(/images/css101-h1.png) left top no-repeat;
    height: 80px;
    width: 240px;
    display: block;
    overflow: hidden;
    text-indent: -9999px;
}
and now we've got a fully text replaced link in all it's clickable glory.
The main difference you'll see here is the addition of 'display: block' to our CSS. This is necessary simply because anchors are inline elements, which means height, width and text-indent will have no effect on them.
One thing to note, this example does only work for block-level elements so be careful in how you use it. I'll be going over inline text-image replacement in the near future.
Well, that's it for the first entry in the 101 series. If you have any questions, comments, or suggestions, feel free to drop me a line at blake[at]markupboy[dot]com.
- How to Hold a Daily Scrum
One of the keys to good project management and teamwork is constant communication. There’s a fine line, however, being staying informed and being bombarded with every minute detail of everyone’s work. Agile Software Development has a nice write up on how to hold a daily scrum, a 15 minute recap of the previous and current day’s status.
- Banishing <div class='clear'>
When dealing with floating containers in HTML and CSS, we all too often turn to the clearing div to make a clean break between container rows. I'm sure you've seen this before:
<div class=“clear”></div>and in the css:
div.clear { clear: both; }Sure, it works. It always has worked and it always will. It's not the most elegant solution, though; it's not semantic and with enough floated containers it can really start to clutter up your markup.Enter the "overflow: hidden" trick. It's not a silver bullet nor will it work in every single situation but it might just save you some markup by using some that you probably already have.
It goes a little something like this. If your floated containers happen to share a common parent (like a wrapper div, or maybe you've got a bunch of floated list items contained in a ul or ol tag) simply set the width of the parent and apply the attribute "overflow: hidden" like so:
<!— the html —>

<div class=“parent”>

 <p class=“column-1”>

  This is column one

 </p>

 <p class=“column-2”>

  This is column two

 </p>

</div>
/_ the css _/
.parent {
width: 400px;
overflow: hidden
}
.column-1 {
width: 180px;
float: left;
}
.column-2 {
width: 180px;
float: right;
}"Surely that can't work," you might say, "the content in the parent element will be clipped!" On the contrary: by not giving the parent container an explicit height only the horizontal space is constrained; the parent will stretch to accommodate its contents while clearing out any elements that aren't contained within it resulting in something a little like this (colors and padding added for demonstration):
So there you have it, a simple and effective alternative to the clear div
- Sexy Music Album Overlays
Helpful reference for CSS image overlays and masking. The same principles used in this album artwork guide can apple to just about anything that needs to be masked.
- Firebug 1.4 alpha
Firebug, the web developer multi-tool for firefox, has a new release on the horizon and is available now as an alpha build for testing. Notable new features include the panel remembering which pages it was open on, and improved UI for the Net panel and tab switching for better usability.
- Removing Default Form Input Values on Click
For an alternative method, see A Better Method for Clearing Default Form Input Values
Another quick and dirty jQuery trick. I often find myself wanting to place form instructions ('enter name here' or what have you) using the value attribute. Forcing a user to manually delete this information isn't what I would call great usability. But, with a little bit of javascripting, removing and replacing defaults on click is a piece of cake:
$('input[type=text], textarea').each(function() {

 $(this).focus(function() {

  if($(this).val() == this.defaultValue)

    $(this).val("");

  });

  $(this).blur(function() {

    if($(this).val() == "")

      $(this).val(this.defaultValue);

  });

});
Simple, right? Now, every time a user clicks a form input or textarea, it will remove the default value. On blur, if no new text was entered, the default value was replaced. If at anytime new data was inserted, it won't ever be removed or replaced but if ever on blur the input is empty, the default value is replaced. Enjoy!
- What's in My Bag
Jumping on the bandwagon with this one. Here's what I've got with me day-to-day:

I carry a recently purchased medium Timbuk2 Commute stuffed with tech goodies. It's a great bag. Plenty of pockets, lots of protection in the laptop compartment and super durable so far (I'm not exactly gentle when it comes to bags). The strap isn't the most comfortable but it does have a quick adjust tab that makes putting on and taking off the bag a snap.
My daily laptop is a mid-2008 MacBook Pro provided to me through work which gets swapped out for my own unibody MacBook Pro when I don't need to work. Along with that I've got a 250GB LaCie rugged portable hard-drive. It's not the most attractive drive out there, or the cheapest, but it's one of the few that have USB 2.0, Firewire 400 and Firewire 800 interfaces which is why I picked it.
For entertainment I've got a 120GB iPod classic, an original iPhone with iPod socks for cases and a pair of Shure SE530 headphones lovingly stored in a cleaned out Altoids case. Not pictured is my work-issued Blackberry 8700 (because really, why would I want to show it off?). And to cap it all off, my assorted low-tech belongings include softcover medium gridded and small unlined Moleskine notebooks, a handful of Uniball Signo and Zebra brush pens, a business card case and a stuffed Wicket for good luck.
- Javascript and GET Variables
Ever needed to deeplink an ajax application or prepopulate some form variables from a GET string on the client-side? Well, here's a little javascript snippet that will help accomplish just that:
function splitURLVars() {
  var getData = new Array();

    var vars = window.location.search;

    if (vars) {

      vars = vars.substr(1);

      var pairs = vars.split("&");

      for (var i = 0; i < pairs.length; i++) {

        var formData = pairs[i].split("=");

        var name = formData[0];

        var value = formData[1];

        getData[name] = value;

      }

    }

  return getData;

};- Limiting Characters in a Textarea with jQuery
Ran into the problem of limiting the characters of a text area on a form recently. In my 8 minutes on google, all of the pure JS solutions felt cumbersome to me so i whipped together this little number in jQuery
$("#textAreaID").keypress(function(e) {

  if(e.charCode >= 48 )

    if($(this).val().length > 150)

      return false;

});
Quick and dirty. JQuery binds a function to the keypress even in the textarea. This function checks if the keyCode of the pressed key is a character input key (see here for a list of keycodes) and, if it is and the character count is over the pre-determined limit, returns false. Easy, right?
Please note, this does require pretty much any version of jQuery to actually work